

Concrete slab installation is a task that demands precision, patience, and the right techniques to ensure the durability and strength of the final product. Whether you’re planning a new patio, driveway, or footpath, it’s critical to approach the job with professional care.
As an experienced contractor, I’ve worked on countless residential and commercial projects, and in this article, I will guide you through the essential steps of installing a concrete slab in Townsville. The humid, tropical conditions here demand specific attention to detail, so read on to ensure your concrete job stands the test of time.
Table of Contents
- Preparing for Your Concrete Slab Installation
- Gathering Essential Tools and Materials
- Site Preparation: Clearing and Leveling
- Formwork: Setting Up the Foundation
- Mixing and Pouring the Concrete
- Finishing Techniques for a Strong, Smooth Surface
- Curing and Protecting the Concrete

1. Preparing for Your Concrete Slab Installation
Proper preparation is essential for a successful concrete slab installation process. Before beginning the concrete slab installation, take the time to accurately measure and plan the area. This step ensures that the slab will meet its intended purpose and fit seamlessly into its environment. Whether you are working on a driveway, patio, or the base for a shed, careful planning will make a significant difference in the outcome.
Determine the slab size and thickness:
Start by measuring and marking out the area where the slab will be installed. It is crucial to take precise measurements to ensure the slab fits properly and serves its purpose. Consider the intended function of the slab, as different applications require different thicknesses. For instance, a driveway or a heavy duty shed base might need a thicker slab than a residential patio. The typical thickness for residential slabs generally ranges from 100mm to 150mm, though this can vary depending on the load it will bear.
Reinforcement considerations:
Reinforcement is a critical factor in any concrete slab installation. For slabs that will support heavy loads, like a driveway or workshop foundation, reinforcement is necessary to maintain the structural integrity of the concrete. This can be achieved by using steel mesh or reinforcing bars (rebar), which are embedded within the slab to improve its tensile strength and resist cracking. Reinforcing your slab is particularly important if the slab is in an area subject to heavy traffic or load bearing pressure. Proper reinforcement ensures that the concrete can withstand the weight and movement over time without compromising its stability.
Planning for expansion and contraction:
Concrete is susceptible to expansion and contraction due to temperature changes, and this can cause cracking if not properly accounted for. When planning your concrete slab installation, include control joints to help manage the natural movement of the material. These joints allow for slight shifts and expansion, preventing cracks from forming in random patterns. In warmer climates like Townsville, where temperature fluctuations can be more pronounced, it is especially important to account for expansion and contraction. Ensure that these joints are placed strategically and deep enough to accommodate the expected shifts without compromising the slab’s overall stability.
2. Gathering Essential Tools and Materials
Selecting quality concrete is crucial for concrete slab installation, as it directly affects the durability and performance of the slab. For most general purpose slabs, a mix ratio of 1:2:3 (cement to sand to gravel) is ideal for concrete slab installation, providing a solid foundation that is strong enough to withstand normal wear and tear. It’s important to understand that the quality of your materials plays a significant role in the slab’s longevity. Townsville, known for its harsh tropical climate with high temperatures and occasional heavy rainfall, demands particular attention when choosing concrete. A poor mix or low quality ingredients can compromise the integrity of the slab over time. Therefore, avoid cutting corners and ensure you use premium materials for concrete slab installation to achieve the best results.
Having the right tools and materials in place before starting concrete slab installation can make the entire process much smoother and more efficient. This planning will save time, reduce mistakes, and ultimately lead to a better outcome.
Essential tools:
Concrete mixer or wheelbarrow: For manual mixing, a wheelbarrow is sufficient, but for larger projects, a concrete mixer will speed up the process and provide a more consistent mixture.
Shovels and rakes: These are essential for evenly spreading and levelling the concrete once it’s poured. They help ensure the slab is uniformly distributed and eliminates air pockets.
Spirit level: This tool is vital for ensuring a level surface during the concrete slab installation process. A well leveled slab is necessary for both structural integrity and aesthetic appeal.
Trowels and floats: These tools are used for finishing the surface of the slab. Trowels help smooth out imperfections, while floats are ideal for giving the surface a more polished, even finish.
Broom: After finishing the slab, a broom is often used to add texture to the surface. This texture helps prevent slipperiness, especially in areas exposed to rain, which is particularly important in the tropical climate of Townsville.
Materials required:
Timber planks for formwork: Formwork is needed to create the mould for the slab. Timber planks are typically used to form the edges of the slab, ensuring the concrete is contained in the desired shape.
Steel reinforcement (mesh or bars): Steel reinforcement is crucial for providing additional strength to the slab, preventing cracking and improving the overall structural integrity. This reinforcement is commonly added in the form of mesh or rebar.
Concrete mix: A well balanced concrete mix is essential for successful concrete slab installation. For general purpose slabs, the recommended mix ratio of 1:2:3 (cement, sand, and gravel) ensures a good blend that will provide the necessary strength and durability. However, adjustments may be necessary based on the specific requirements of your project.
Quality considerations:
High quality cement: Using top grade cement is essential for ensuring the slab’s durability. Inferior cement can lead to cracking, erosion, and reduced lifespan of the concrete.
Climate considerations: Given the hot and humid climate in Townsville, it is advisable to choose a concrete mix that can withstand high temperatures and heavy rainfall. A well-adjusted mix will ensure the concrete slab resists thermal expansion and contraction, which can otherwise cause cracking and degradation over time. Additionally, it is important to factor in the possibility of delayed curing due to Townsville’s climate, so adequate curing time and methods should be planned for.
3. Site Preparation: Clearing and Leveling
Proper site preparation ensures a stable foundation for the concrete slab installation, which is crucial for its long term durability and performance. Without adequate preparation, the slab could experience cracking, settling, or shifting over time.
Marking out the area:
Begin by using stakes and string to outline the exact dimensions of the concrete slab installation area. This step ensures that the slab will be laid precisely in the desired location, adhering to the correct measurements and shape. It’s essential to double check all measurements before proceeding with further work, as even slight inaccuracies at this stage can cause significant issues later on. Ensure that the markings reflect any necessary allowances for things like expansion joints or formwork.
Clearing the site:
Clearing the site involves removing any debris, vegetation, roots, or other organic matter that could interfere with the slab’s foundation. Roots, if left in place, can decompose over time, causing uneven settling or even cracks in the slab. Vegetation can also promote moisture retention, leading to instability in the ground beneath. If the soil is particularly hard or uneven, excavation may be required to level the ground, especially for areas like driveways or patios. Proper site clearance is vital to prevent any future disruptions that could compromise the integrity of the concrete slab installation.
Creating a solid base:
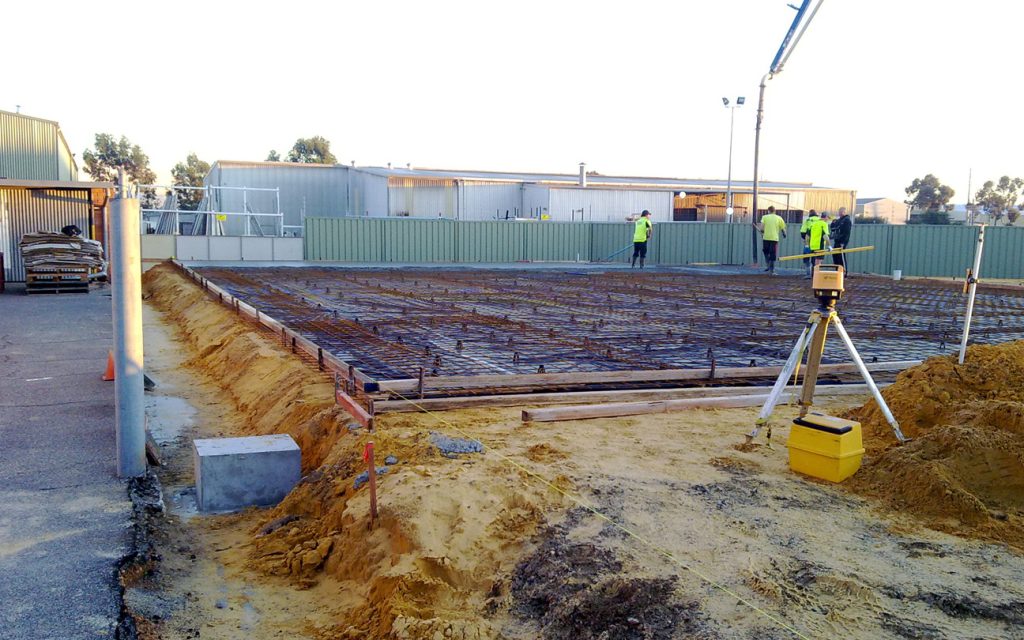
Once the site is cleared, it’s essential to create a solid base to support the concrete slab installation. The ground must be compacted thoroughly to prevent shifting, settling, or cracking once the slab is poured. If the ground is loose or soft, use a compactor to compact the soil and create a firm surface. For added stability and improved drainage, a 100mm layer of compacted gravel should be added. This gravel layer also helps to prevent moisture build up beneath the slab, which could lead to future issues. Proper grading is also crucial at this stage. Ensure that the surface slopes slightly away from any nearby structures to direct water runoff away from the slab, reducing the risk of water damage or pooling around the foundation. Proper drainage is key to the longevity of the concrete slab installation.
4. Formwork: Setting Up the Foundation
Formwork plays a crucial role in concrete slab installation as it acts as the mould that holds the concrete in place during the setting process. It ensures that the slab retains its shape and dimensions until the concrete hardens sufficiently to support itself.
Building sturdy formwork:
To create reliable formwork for concrete slab installation, it’s essential to use strong timber planks, which provide adequate support and maintain the shape of the slab. Secure these planks in place using wooden or metal pegs to ensure stability. Take the time to check that the formwork is straight, level, and square at the corners. Accurate alignment at this stage is critical, as any errors will affect the final shape and quality of the concrete slab.
Preventing concrete adhesion:
During concrete slab installation, one common challenge is the potential adhesion of concrete to the formwork. To prevent this, apply a release agent, such as oil or a commercial concrete form release spray, to the inside surfaces of the formwork. This creates a thin barrier that prevents the concrete from sticking, allowing for easier removal of the formwork once the slab has cured. Not only does this facilitate the removal process, but it also ensures that no unwanted residues are left behind, which could affect the slab’s finish or appearance.
Reinforcement placement:
Reinforcement is a vital component in concrete slab installation, as it strengthens the slab and helps it withstand stresses. To achieve this, position steel mesh or reinforcing bars inside the formwork before pouring the concrete. The placement of the reinforcement should be precise, with spacers used to ensure that the steel is slightly elevated from the base of the formwork. This elevation guarantees that the reinforcement is properly embedded within the slab once the concrete is poured, providing the necessary structural integrity.
5. Mixing and Pouring the Concrete
Concrete slab installation is a process that requires careful attention to detail, especially when it comes to mixing, pouring, and ensuring the concrete is properly settled. Each step plays a crucial role in achieving a strong and durable slab that will stand the test of time.
Mixing concrete:
When preparing the concrete mix, it’s essential to get the correct proportions of cement, sand, aggregate, and water. You can use a concrete mixer, which provides a more consistent mix, or opt to mix manually in a wheelbarrow if you’re working on a smaller project. It’s important to gradually add water, ensuring that you don’t use too much, as this can weaken the final product. On the other hand, too little water can result in a mix that’s difficult to work with and might not flow into the corners and edges of the formwork. Always check the consistency by making sure the mix holds its shape without being too dry or too runny.
Pouring the concrete:
When pouring the concrete, it’s best to do it in stages rather than trying to pour all at once. This ensures even distribution across the slab and reduces the likelihood of uneven curing. As you pour, use a shovel or a rake to help move the concrete into the corners of the formwork, ensuring that the slab is fully covered and no gaps are left. The aim is to create a smooth, even surface that aligns with the prepared slab form.
Eliminating air pockets:
Air pockets can significantly weaken the concrete, leading to potential issues such as cracking or voids in the slab. To prevent this, tap the sides of the formwork gently with a hammer or use a vibrating tool, which helps the concrete settle and release trapped air. This step ensures the concrete fills all spaces evenly, creating a solid and robust foundation for whatever structure is being built on top.
Avoiding cold joints:
Cold joints occur when different layers of concrete start setting at different times, creating weak spots between the layers. To avoid this, aim to pour continuously so that the entire slab is laid without interruptions. If you experience any delays, try to blend the new concrete into the existing mix as smoothly as possible, ensuring the layers bond together. This will help maintain the strength of the slab and prevent the formation of weak joints that could compromise the overall integrity of the installation.
6. Finishing Techniques for a Strong, Smooth Surface
Once the concrete slab installation has been completed and the concrete has been poured, finishing techniques help achieve the desired surface quality, durability, and aesthetic appeal. The process of finishing ensures that the concrete slab is both functional and visually appealing, while also providing necessary protection against cracking and weather conditions.
Levelling the Surface:
After pouring the concrete, it’s crucial to level the surface to ensure that it is even and smooth. To achieve this, use a straight edge or screed board to smooth out any high or low spots across the slab. Work in a back-and-forth sawing motion, moving the screed board across the wet concrete. This action helps to push the excess concrete into the low spots while allowing the high spots to be shaved off. Ensure that the surface is level by checking it regularly with a spirit level, ensuring a consistent depth across the entire slab.
Applying Different Finishes:
To achieve the desired surface texture, different finishing techniques can be applied. For a smooth finish, use a steel trowel to refine the surface once the concrete has set. This process is typically done when the concrete begins to harden but is still moist, helping to create a smooth, shiny finish. For areas requiring slip resistance, particularly on driveways and patios in wet conditions, drag a broom lightly over the surface of the concrete. The broom’s bristles will create a textured finish, providing better traction and reducing the likelihood of slips.
Edging and Jointing:
Edging helps create a clean, rounded appearance on the perimeter of the concrete slab. To do this, use an edging tool to carefully round off the edges of the slab. This not only provides a neater look but also helps to protect the edges from chipping. Additionally, it’s important to cut control joints using a saw or groover. These joints allow for natural expansion and contraction of the concrete, reducing the risk of cracking over time. Control joints are typically spaced at regular intervals, and cutting them soon after the concrete has hardened ensures that the slab can expand and contract without causing damage.
7. Curing and Protecting the Concrete
Proper curing during concrete slab installation is critical for achieving maximum strength and durability. Without proper curing, the concrete may not reach its optimal strength, leading to potential weaknesses and a reduced lifespan of the slab. Here’s a closer look at the steps involved in ensuring effective curing:
Maintaining moisture:
One of the most important aspects of curing concrete during slab installation is maintaining adequate moisture levels. Concrete needs moisture to continue the hydration process, which is essential for the chemical reactions that form the hardened material. It’s recommended to keep the slab moist for at least 7 days, which can be done using water sprays or wet covers. This extended hydration period allows the concrete to fully bond and develop its strength, reducing the risk of cracks forming due to insufficient moisture. The key is to ensure that the surface remains moist without allowing excess water to pool, as too much water can weaken the final structure.
Avoiding premature stress:
Another important consideration during concrete slab installation is to avoid subjecting the slab to premature stress. Concrete is vulnerable in the early stages of its curing process, and exposing it to heavy traffic, machinery, or load bearing weight can compromise its integrity. For best results, avoid placing any heavy load or allowing any form of traffic on the slab for at least 28 days. This allows the concrete to reach its full strength. Additionally, protect the slab from extreme environmental conditions such as excessive sun and wind. These factors can lead to rapid drying on the surface, which may cause cracks. A balance of temperature and moisture is crucial to achieving a strong, crack free slab.
Sealing for protection:
After the curing process, you may want to apply a concrete sealer to further protect the slab. Sealing the concrete enhances its durability by providing an extra layer of protection against environmental factors. In particular, applying a sealer helps prevent stains, moisture penetration, and damage from the harsh climate conditions in Townsville. The sealer will also act as a barrier against chemicals, oils, and other substances that might otherwise degrade the surface over time. It’s important to choose a sealer that is appropriate for the climate and the specific needs of your slab, as this can make a significant difference in maintaining its condition.
By following these steps carefully during the concrete slab installation process, you can ensure a long lasting, high quality slab that is well suited to your needs and able to withstand the conditions of your location. Proper curing, moisture maintenance, stress prevention, and sealing all play a vital role in creating a strong, durable concrete foundation that will serve you well for years to come.
Why Choose Us?
As a contractor with extensive experience in concrete slab installation in Townsville, I understand the unique demands of concrete work in this climate. Here’s why you should choose us for your next project:
- Local Expertise: We understand the local conditions and know how to adapt concrete techniques to suit Townsville’s climate.
- Quality Materials: We only use high grade concrete and reinforcement materials to ensure durability.
- Tailored Solutions: Whether it’s a driveway, patio, or path, we customise each job to meet your specific needs.
- Attention to Detail: From preparation to finishing, we ensure each step is completed with precision.
- Customer Satisfaction: We guarantee a high standard of workmanship, ensuring you’re happy with the final product.
Contact our concreting company today to discuss your concrete slab installation needs, or request a free, no obligation quote!
FAQs
This thickness is suitable for light vehicles such as cars and small utes for concrete slab installation. However, if you plan to park heavier vehicles like caravans, trucks, or trailers, increasing the thickness to around 125mm or more is recommended for concrete slab installation. Reinforcing the slab with steel mesh or rebar during concrete slab installation will further enhance its strength and longevity. Additionally, using a high quality concrete mix with a minimum strength of 25MPa for concrete slab installation will help withstand daily wear and tear.
The first step in concrete slab installation is to clear the site of any debris, vegetation, or old concrete to create a clean surface. Next, compact the soil to provide a stable foundation, which prevents future movement and cracking. Laying a 100mm layer of crushed rock or gravel and compacting it further ensures good drainage and additional support for the concrete slab installation. Installing formwork to define the slab’s shape and using a plastic moisture barrier underneath will also help prevent water seepage from the ground, which can weaken the concrete over time.
The curing process is essential in concrete slab installation because it allows the concrete to reach its full strength gradually. To ensure even curing and prevent surface cracks in concrete slab installation, it’s important to keep the slab moist for at least the first seven days. This can be done by regularly spraying it with water, covering it with plastic sheeting, or using a curing compound. Temperature and humidity also affect curing time—hot weather can cause rapid drying, leading to cracks, while colder conditions can slow down the process.
Concrete naturally expands and contracts with temperature changes, so adding control joints at regular intervals helps guide where cracks form, keeping them neat and controlled. Proper ground preparation, including compacting the base and ensuring even thickness, also plays a major role in preventing cracks. Avoid pouring concrete on extremely hot or cold days, as extreme weather can cause premature drying or freezing, leading to structural weaknesses. Additionally, allowing the concrete to cure slowly by keeping it damp for the first few days will help maintain its strength.
During concrete slab installation, rain can weaken the surface of fresh concrete. If the forecast predicts rain on the day of your pour, it’s best to delay the project or take precautions. Light rain may not be a major issue, but heavy rain can wash away the cement from the surface, leading to an uneven, weak finish. If rain is unavoidable, covering the slab with plastic sheeting or temporary shelters can help protect it. If water does accumulate on the surface before the concrete sets, avoid working it in, as this will weaken the slab. Instead, gently remove excess water with a sponge or plastic sheet.
For concrete slab installation, seal your slab to protect it from water and weather damage. Regularly clean the surface and avoid using harsh chemicals.egular sweeping and occasional washing with mild detergent will keep it clean and prevent dirt buildup. Sealing the surface every two to five years provides extra protection against moisture, stains, and wear. Avoid using harsh chemicals or de-icing salts, as these can degrade the concrete over time. If cracks do appear, sealing them promptly with a concrete repair product will help prevent them from expanding and causing further damage. For driveways, avoid parking heavy vehicles in the same spot for extended periods, as this can lead to surface wear and stress over time.
Small concrete slab installation for garden sheds, pathways, or patios often do not require approval, but larger concrete slab installation, particularly for driveways or structural use, usually need council approval. In some cases, concrete slab installation that alters drainage or is close to property boundaries may also require a permit. It’s always best to check with your local council before starting the project to avoid potential fines or the need for costly modifications later. Consulting with a professional contractor can also help ensure compliance with building codes and regulations.
